【PHP】PHPでGoogleDriveにファイルをアップロードするテンプレート(2021年8月23日)
フォームからファイルをGoogleDriveにアップロードするためのテンプレートです。「Google Drive Client PHP」を利用しますのでインストールをしていきます。最小構成になっていますので、動作することが確認できましたら、機能を追加してみてください。
省略前のコードにつきましてはこちらを御覧ください
目次
必要なもの
- クライアントIDのJSONファイル
- 認証後トークンのJSONファイル
クライアントIDのJSONファイルの作成
GoogleAPI の認証情報の作成をします。
https://console.cloud.google.com/apis/dashboard
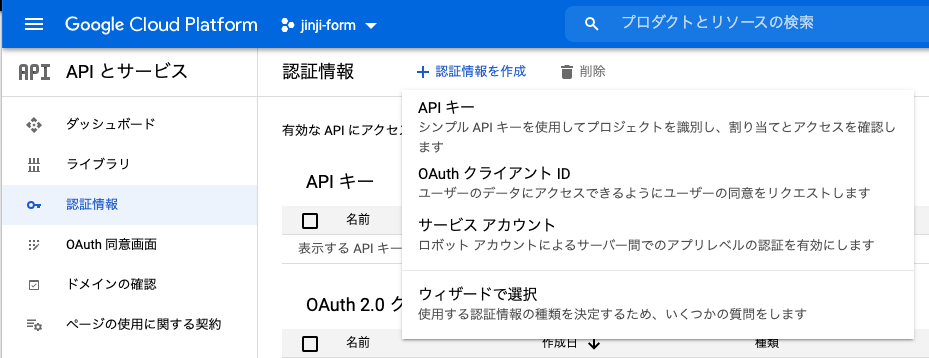
認証情報の作成 → ウィザードで選択
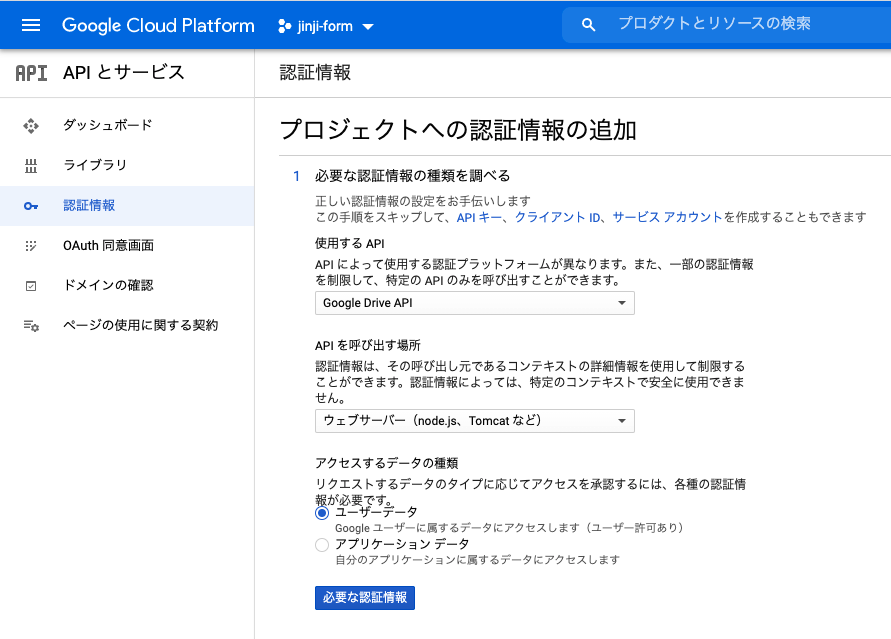
使用するAPI → Google Drive APIを選択
APIを呼び出す場所 → ウェブサーバー
アクセスするデータの種類 → ユーザーデータ
を選択する。
OAuth同意画面の設定が必要であれば
アプリ名 → 任意
ユーザーサポートメール → 任意のメールアドレス
デベロッパーの連絡先情報 → 任意のメールアドレス
スコープの設定 → 必要なスコープを選択
上記で設定する。
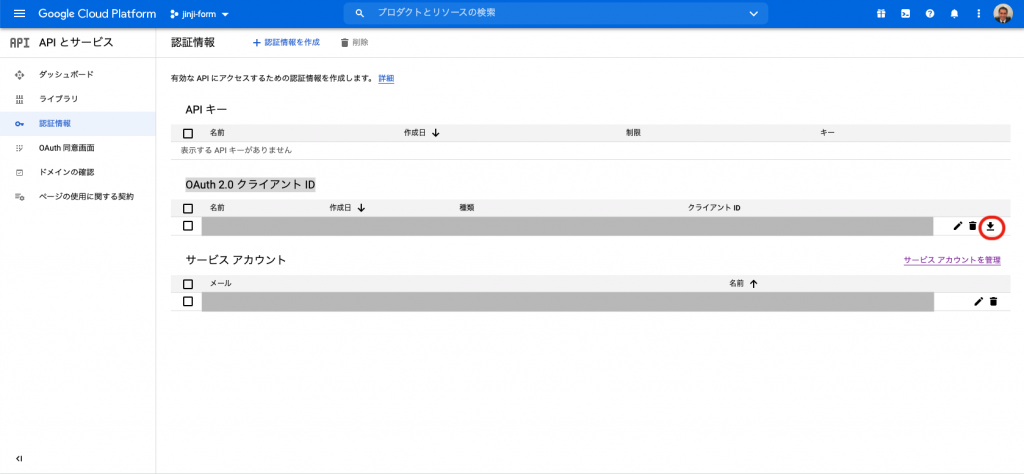
OAuth 2.0 クライアント IDが作成できたら、クライアントIDのJSONファイルがダウンロードできますので「client_id.inc」という名前で保存してください。
認証後トークンのJSONファイルの作成
クライアントIDのJSONファイルのデータを使用します。
以下のURLにクエリパラメータを追加してブラウザでアクセスする
https://accounts.google.com/o/oauth2/auth
例
https://accounts.google.com/o/oauth2/auth
?client_id=[取得したクライアントID]
&redirect_uri=[リダイレクトURI]
&scope=https://www.googleapis.com/auth/drive (使用したいサービスのAPIにスコープする。今回はGoogleドライブ)
&response_type=code (認証をコードとして出力)
&approval_prompt=force (認証をスキップしない)
&access_type=offline (オフラインでAPIを使用=リフレッシュキーを発行)
実際に送るURL
redirect_uriにつきましては今回は「http://localhost」でOKです。
https://accounts.google.com/o/oauth2/auth
?client_id=343******************************ggso1d8.apps.googleusercontent.com
&redirect_uri=http://localhost
&scope=https://www.googleapis.com/auth/drive
&response_type=code
&approval_prompt=force
&access_type=offline
上記のURLをブラウザに入力しENTERを押す。
下記の画面がでるので「許可をクリック」する。
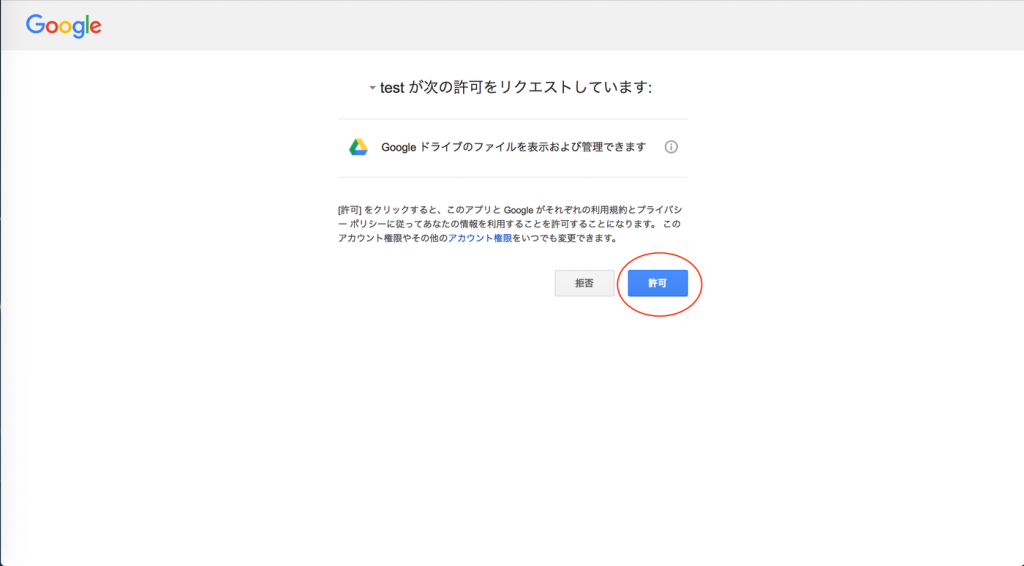
「このサイトにアクセスできません」と表示がされるが、URLにコード値が返ってきているのでcode=以下をコピー
ターミナルなどで下記コードを実行する。「”」などはいらない。
curl -d client_id=[クライアントID] -d client_secret=[クライアントシークレット] -d redirect_uri=[リダイレクトURI] -d grant_type=authorization_code -d code=[認証コード] https://accounts.google.com/o/oauth2/token
上記を実行すると認証後のJSONが返ってくるのでコピーして「access-token.inc」という名前で保存をします。
ファイルの構成
ファイルの構成は下記のようになります。srcフォルダはダウンロードでのインストール時のみ必要です。

FormTest/
     ├PHP/
     │   ├vender/
     │   ├(src/)
     │   └ uploaddrive.php
     ├json/
     │    ├ access-token.inc
     │    └ client_id.inc
     │
     └index.php
Google Drive Client PHPのインストール
GoogleAPIを使用するために、Google Drive Client PHPライブラリーをインストールします。インストールする方法はcomposerを使用する方法とファイルをダウンロードしてフォルダに入れる方法があります。
①composer使う場合
ターミナルでPHPフォルダで下記を実行します。
composer require google/apiclient:^2.10「vender」というフォルダが生成されれば成功です。
②ダウンロードする場合
ここのreleasesからダウンロードします。解凍して「vendor」と「src」を「PHP」フォルダに入れます。
PHPファイルの作成(uploaddrive.php)
下記をコピペして「uploaddrive.php」ファイルを作成してください。アップロード先のフォルダIDと共有フォルダの場合は共有フォルダのルートファイルIDを入力してください。共有フォルダへのアップロードについてはこちらを御覧ください。
<?php

//ファイルのアップロード

/************************************************/
/* uploaddrive.php                      */
/* FolderId : アップロード先のフォルダ名         */
/* DriveId  : 共有フォルダのファイルパス       */
define('FolderId', '1xX8gBw7r5nPa-*************');
define('DriveId' , '0AHbLJ**************',);

/* Load previously authorized credentials path. */
define('CREDENTIALS_PATH', __DIR__ . '/json/access-token.inc');
define('CLIENT_SECRET_PATH', __DIR__ . '/json/client_id.inc');

/************************************************/

require_once __DIR__ . '/vendor/autoload.php';
define('APPLICATION_NAME', 'DBBackup');

// ScopeをDRIVE_FILEに設定する
define('SCOPES', implode(' ', array(
    Google\Service\Drive::DRIVE)
));

$error = "";

/**
 * Returns an authorized API client.
 * @return Google_Client the authorized client object
 */
function getClient() {
    $client = new Google\Client();
    $client->setApplicationName(APPLICATION_NAME);
    $client->setScopes(SCOPES);
    $client->setAuthConfig(CLIENT_SECRET_PATH);
    $client->setAccessType('offline');
    $credentialsPath = expandHomeDirectory(CREDENTIALS_PATH);
    $accessToken = json_decode(file_get_contents($credentialsPath), true);

    $client->setAccessToken($accessToken);

    // Refresh the token if it's expired.
    if ($client->isAccessTokenExpired()) {
        $client->fetchAccessTokenWithRefreshToken($client->getRefreshToken());
        file_put_contents($credentialsPath, json_encode($client->getAccessToken()));
    }
    return $client;
}


/**
 * Expands the home directory alias '~' to the full path.
 * @param string $path the path to expand.
 * @return string the expanded path.
 */
function expandHomeDirectory($path) {
    $homeDirectory = getenv('HOME');
    if (empty($homeDirectory)) {
        $homeDirectory = getenv('HOMEDRIVE') . getenv('HOMEPATH');
    }
    return str_replace('~', realpath($homeDirectory), $path);
}


// 引数の確認
function uploadFile($files,$folderName,$namestr){
    //フォルダーIDの設定

    $folderId= FolderId;
    $filePaths = $files["file"]["tmp_name"];
    $client = getClient();

    $driveService = new Google\Service\Drive($client);
    $error="";

    try{
        // フォルダを新規作成する
        $fileData = array();
        $fileData['name'] = $folderName;
        $fileData['mimeType'] = 'application/vnd.google-apps.folder';
        $fileData['parents'][] = $folderId;

        $fileMetadata = new Google\Service\Drive\DriveFile($fileData);

        $file = $driveService->files->create($fileMetadata,array(
            'fields'=>'id,name,parents',
            "supportsTeamDrives" => true,
        ));

        $createfolderId = $file->id;
    } catch (Google_Service_Exception $e) {
        $error .=$e->getMessage();
    } catch (\Google_Exception $e) {
        $error .=$e->getMessage();
    }

    $count=count($filePaths);
    for ($i = 0; $i < $count ; ++$i){

        $createfileName = $namestr.pathinfo($_FILES["file"]["name"][$i], PATHINFO_EXTENSION);
       // アップロードするGoogle DriveのフォルダのIDとファイル名を指定する
        $fileMetadata = new Google\Service\Drive\DriveFile(array(
                        'name' =>  $createfileName,
                        'DriveId' => DriveId,
                        'teamDriveId' => DriveId,
                        'parents' => array($createfolderId),
                        "includeTeamDriveItems" => true,
                        "supportsTeamDrives" => true,
                ));

    // アップロードするファイルのMIMEタイプを取得する

        $mime = mime_content_type($filePaths[$i]);

        try {
            $content = file_get_contents($filePaths[$i]);
            $file = $driveService->files->create($fileMetadata, array(
                    'data' => $content,
                    'mimeType' => $mime,
                    'uploadType' => 'multipart',
                    "supportsTeamDrives" => true,
                    'fields' => 'id',
            ));

            // print "File '$fileName' uploaded with id '$file->id'" . PHP_EOL;
        }
        catch (Exception $exc) {
            $error .= "Error working with file '$createfileName':" . $exc->getMessage();
        }
    }
    $message = array(
        "folderID"=>$createfolderId,
        "error"=>$error,
    );
    return $message;
}
フォームの作成(index.php)
<!DOCTYPE html>

<?php
ini_set('log_errors','on');
//エラーレベルを設定
ini_set('error_reporting', E_ALL);
//ログの出力ファイルを指定
ini_set('error_log','php.log');

if ($_SERVER['REQUEST_METHOD'] == "POST") {
    require_once __DIR__ . '/php/uploaddrive.php';
    uploadFile($_FILES,"フォルダ名","TEST");
    echo '<div class="m-2 alert alert-success" role="alert">送信完了</div>';
}
?>

<html lamg="ja">
<head>
    <meta charset="UTF-8">
    <title>ファイル送信</title>
<!-- CSS only -->
<link href="https://cdn.jsdelivr.net/npm/bootstrap@5.0.0-beta1/dist/css/bootstrap.min.css" rel="stylesheet"
    integrity="sha384-giJF6kkoqNQ00vy+HMDP7azOuL0xtbfIcaT9wjKHr8RbDVddVHyTfAAsrekwKmP1" crossorigin="anonymous">
</head>

<body>
    <div class="container">
        <h1>ファイル送信</h1>
        <form class="needs-validation" action="" method="POST" enctype="multipart/form-data">
            <div class="formBox">
                <input type="hidden" name="MAX_FILE_SIZE" value="6000000000000" />
                <input type="file" class="form-control" id="file1" name="file[]" >
                <button type="submit" class="btn btn-primary btn-block mt-3">送信</button>
            </div>
        </form>
    </div>
</body>
</html>
上記のフォームからファイル送信をすると、「送信完了」と表示され、GoogleDriveのフォルダにファイルのアップロードができていると思います。
ファイルの送信ができない場合
ファイルの送信ができない場合、「php.log」というファイルを確認します。
Your Composer dependencies require a PHP version “>= 8.0.0"
Parse error: syntax error, unexpected '|’, expecting variable
ここのサイトを参考にすると上記のエラーはpsr / cacheがphp8以上対応になっているからのようです。そのため下記を実行してpsr / cacheのバージョンを下げる必要があります。
composer.jsonの修正
composer.jsonに「"psr/cache": “^1.0″」を追加します。
{
    "require": {
        "google/apiclient": "^2.10",
        "psr/cache": "^1.0"
    }
}
ターミナルで下記を実行
composer update参考にしていただければ幸いです!




ディスカッション
コメント一覧
参考にさせていただいています。
「認証後トークンのJSONファイルの作成」の「4で設定したリダイレクトURI」とは何を指すのでしょうか。よろしければご教示願います。
今回の方法では「http://localhost」でOKです。
ご回答ありがとうございます。
VPSやレンタルサーバーで実行するときはどうでしょうか。
今回の方法ではアクセストークンを取得するだけなので、localhostで問題ありません。
取得したトークンの取り扱いには十分ご注意ください。